Volume

11/24/2013

1 Comment

 
For the past couple of weeks in class we have been focusing on the volume of solid shapes. In class, we have used plastic solid shapes and have filled them with water, and measured out the water to see how much volume certain solid shapes have, such as rectangular prisms and spheres. For daily work this week I decided to measure my own solid shapes using two different methods. One being measuring the shapes and finding volume with an equation and the other method I will use is measuring volume by putting the shapes in water. 

Fortunately, my mom is an AP Biology and Environmental Science teacher so she supplied me with the graduated cylinders, marbles, and some rocks. Also I am fortunate that my parents never gave away my old building blocks from when I was younger so I can use them for my math lesson.  
The first activity I did used the building blocks. I measured the volume of rectangular prisms, triangular prisms, cylinders, and a cube. The way I found the volume was by measuring with a ruler and then using an equation. This method for finding volume would be good for students grades 6-8. 
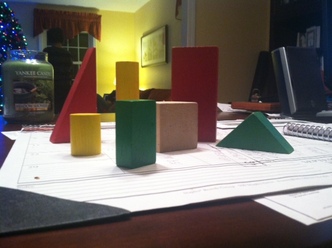
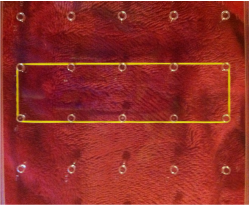
The first shapes I measured were the big rectangular prism and the smaller rectangular prism. The equation to find the volume of a rectangular prism is... 
length x width x height
So, I measured the sides of the prisms. The larger prism had a length of 11.5 cm, a width of 5.5 cm, and a height of 2.4 cm. So, 11.5 x 5.5 x 2.4= 149.16 centimeters cubed. 

The smaller rectangular prism had a length of 5.3 cm, a width of 3.4 cm, and a height of 2 cm. So, 5.3 x 3.4 x 2= 36.04 centimeters cubed. 
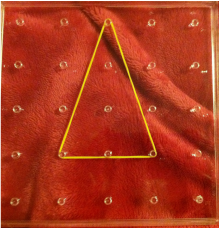
The next shapes I measured were the little green triangular prism and the bigger red triangular prism. The equation for finding the volume of a triangular prism is... 
1/2 x Base x Height x Length. 

Here is a diagram that I found on Google Images that might be helpful for when you find the volume of a triangular prism: 
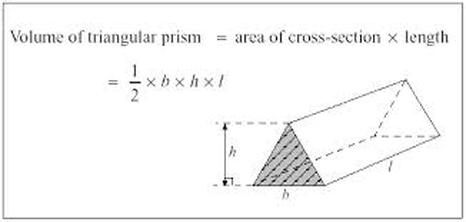
After measuring the smaller triangular prism the base was 2.5 cm, the height was 3.5 cm, and the length was 8 cm. So, 1/2 x 2.5 x 3.5 x 8= 35 cm cubed. 
The larger triangular prism had a base of 2.6 cm, a height of 3 cm, and a length of 11.5 cm. So, 1/2 x 2.6 x 11.5 x 3= 44.85 centimeters cubed. 
Then I measured the two cylinders. To find the volume of the cylinders I took 
pi (3.14) x radius squared x height. 
So I measured the bigger cylinder first the radius was 1.5 cm and the height was 10 cm. So I then I did (1.5)^2 x 10 x Pi= 70.69 cm cubed. 
The smaller cylinder had a radius of 1.4 cm and a height of 3.9 cm. So, (1.4)^2 x 3.9 x Pi= 24.01 cm cubed. 
Finally, I saved the easiest for last. Finding the volume of the cube. Each side had a side length of 5 cm so I knew I had to do 5 x 5 x 5 since 5 cm was the length, height, and width. My answer was 125 cm cubed. 

This volume activity led me into finding the volume of irregular solid shapes. I decided to find the volume of a marble, a granite rock, and a quartz mineral.
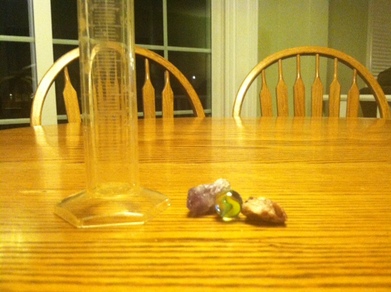
To find the volume of each of these objects I filled the graduated cylinder to 40 ml with water. Then I dropped each object in the graduated cylinder filled with water. Then however much the water increased when I dropped the object in the water is the volume of the object.

The first object I measured was the marble. I dropped it in and the water filled up to 42 ml. So, 42-40= 2. So the volume of the marble is 2 ml or 2 cm cubed. 

The second object I measured was the quartz mineral. I dropped it in the water and the water increased to 44 ml, so 44-40= 4 ml or 4 cm cubed. 

Then the last object I dropped into the graduated cylinder was the granite rock. When I dropped it in the cylinder the water increased to 43 ml so 43-40= 3 ml or 3 cm cubed. 

I think this activity would be good for upper elementary school students since there is no complicated equations involved and this activity is more visual. All the students have to do is be able to measure out water and subtract numbers. It's necessary to have objects that will sink to the bottom of the graduated cylinder or measuring cup, because the activity will not work with items that float. 
Reflection: I think these two volume activities I did would be good for students to visually understand volume and they get to work hands on with measuring tools, instead of doing book work problems and just having to visualize the solid objects in their minds. 

Feedback: Would these activities benefit students knowledge of volume? What other ways could I teach volume besides the ways we've done in class and the two ways I just did? 
 
Today, our Math 221 class attended Dr. Kevin Cloninger's lecture, "Thinking Outside the Job: Helping Students Learn to Live the Good Life". For daily work we were asked to write on our blog a response/summary of the lecture we attended. 

Summary:
Going into this lecture I had no idea what to expect. I thought it was going to be a lecture just on how to be a better teacher. This lecture did inform me on how to be a better teacher, but it also informed me how to live a better life. Cloninger started the lecture off with talking about well-being and what it is. When I think of well-being I immediately think health, but otherwise I do not think very much about it. Cloninger began discussing that children and adults are not necessarily living a good life. Several children and adults are affected by childhood obesity and other diseases caused by poor eating habits and lack of exercise. Cloninger also brought up that depression will soon be the leading illness/disability. What Cloninger was getting at was the fact that in the 21st century we as human beings are not focusing on having a "good life". The things we are teaching our students and children are that the most important things in life are a good job and having a lot of money. Cloninger reminded us that this is definitely not true. 

Cloninger expressed that we need to focus on having a good life instead of having a good job. There are several problems occurring in the world right now, such as hunger and climate change. We need to focus on fixing our ways of life to be healthy and live in a healthy world. Something Cloninger kept saying was that "It's too late to be pessimistic". We need to start making changes in our lives now. 

Another thing that Cloninger discussed was how reliant the world is on technology. The fact that people are constantly using our phones, going on the internet for things such as Facebook, and watching television. Cloninger had some data of how many hours people waste their lives using technology like this. 

Overall, he was saying as educators and parents we need to focus on students and children's well-being, instead of focusing on the global economy. It's necessary to focus on a good life to successfully live in the 21st century. 

My Response: I thought it was strange because I had been thinking a lot about the things Cloninger was saying in his lecture before I even attended his lecture. I thought I was the only one thinking these thoughts, but luckily I am not. 

I think teaching students how to live a good life is essential. We also need to teach kids and even teach ourselves to live in a 21st century world. We really need to focus on climate change, since ultimately human's are destroying the world. We also need to focus on our health and eating habits, since human's are also destroying themselves with very unhealthy eating habits. 

As far as technology goes, I feel we rely on it way too often. Recently I have tried to "boycott" Facebook (except for when I have to post my math weekly works on Facebook) and I have been trying to use unnecessary technology less often. My reason for boycotting Facebook has been due to my recent research on Facebook and depression.  Honestly, there is so much I could say about these subjects and I could write pages and pages about the issues of the 21st century, so I will try to stop ranting and get back to my response. 

Overall, I feel that as a future teacher we really need to focus on well-being and teaching kids how to be healthy and live in a healthy world. I definitely am trying to start living a healthy lifestyle myself, and I want to promote living a healthy lifestyle to future generations. I believe this lecture was very beneficial for our class to attend and I hope other people benefited as much as I did from it. 
 
Family Math Night finally approached this past Thursday night at a Grand Haven elementary school. The game I had prepared for the students was a probability game called, "Build an Animal". When my partner and I tested the game out on the 5th graders before family math night the game was a great success. The 5th graders loved it and thought it would be a great game for younger students. The experience with the 5th graders made me confident about Family Math Night.

The night of Family Math Night I had prepared all of the animals for my game and created a rule sheet. When the night started my partner and I had to wait a little bit for anyone to come play our game. Finally, the first students wandered into our room and we explained the game. One of the students was very young, possibly in kindergarten while her brother was probably in about 2nd grade. The age difference between the two players really affected the game play. The younger student did not understand some of the rules and decided to do her own thing and just roll the die and choose whatever animal part she wanted, while her older brother tried to follow the rules. That was something I was very unprepared for. 

Children not following the rules of the game was a common pattern throughout the night. Younger students would get very upset when they rolled a number of a part they already had and so they had to skip a turn. They also were upset when they rolled a 5 which meant they had to steal a part from another player. We quickly had to adapt the rules for the younger students so that when they rolled a number they already had, they could roll again. With the stealing, we eventually changed the rule to, "steal a part from any pile" to avoid catastrophe. 

Another problem we faced at Family Math Night was explaining the math behind our game to younger students. The students that were probably in 1st grade and under struggled understanding the game, let alone the math behind it. Before Family Math Night I thought that younger children could easily play the game, but after actually working with them, I realized it was difficult for them. This made me realize this game is definitely meant for students from 2nd grade to possibly 4th grade. 

Family Math Night taught me that I need various adaptations of a game for each age group when working at an event like this. Though, there were some drawbacks of our game on the actual night, some students really enjoyed our game. The students that enjoyed our game the most were probably in the 2nd-4th grade range. Overall, Family Math Night was a great experience and has taught me a lot about teaching and I feel that it has made me a better teacher.  
 
Family Math Night is this Thursday and we cannot believe how fast it is approaching! Our activity is called "Build an Animal" and it is a math game based on probability. In my last post about Family Math Night I roughly explained the basis of the game and some of the game rules. In my last post I was preparing to play this game with the Grand Haven 5th Graders for the first time. Now, after playing the game with several different kids, they gave Sara and I excellent feedback. Some feedback was brutally honest, but as a whole the feedback we got helped us out in the long run. 

Questions/Feedback Received from the 5th Graders: 
"What math is in this game/what is probability?"
"There should be more animals to choose from"
"There should be a paper with all of the different rules and which each number on the die represents" 

Things Learned from 5th Graders Playing the Game:
  • We need a fair way to decide who goes first.
  •  We need to explain what probability is before we start the game and we need to possibly keep track of what the probability is after each turn (for more advanced/higher grade level students) 
  • We need more dice so there can be more players.
  • More animals are needed, for more choices and more fun.
  • To prevent fighting possibly have kids choose an animal part from a bag so it is random and fair. We could have the kids figure out the probability of getting their favorite animal.
New and Improved Game: 
Before the Game:
Before the game begins and is explained Sara & I are planning on explaining what probability is. We might hand out a handout on what probability is if needed. Then we will go on to explaining the game. 
Explanation of the Game: There will be four piles or bags with different animal parts. The different piles consist of tails, legs, bodies, and heads. The goal of the game is to create a complete animal with four legs, one tail, a body, and one head. The animal can be as crazy as the student wants. Each student will have a die and will take turns rolling a die. The number the student rolls represents a different rule/body part. Whoever is the first to complete an animal wins the game. 
To decide who gets to go first, Sara & I decided to have all of the players roll their dice and whoever rolled the highest number went first. 
Picture


Something we previously added to the game was a list of the rules for each number on the die to help guide the students as they play the game.  

Picture

Another thing added to the game was three more animals for more variety and more players. 

Unfortunately, I was not able to test out the game in Grand Haven a second time with these new additions, I was not able to receive more feedback from the 5th graders. To get the best test experience I could I played the game with my friend, Tony. The first time I won the game and the second time Tony won. The game went smoothly and no big catastrophes happened. 
Reflection: Making this Family Math Night activity took a lot of time and work with creating the different animal parts. The feedback from the fifth graders definitely helped the process. The activity is pretty much completed, but there are some finishing touches that need to be done. 
Feedback: Throughout this project I feel like I/we have been struggling with making this activity vividly have math. Is explaining probability before the game enough? Or should we have the students record the probability of winning the game after each turn? I feel like doing that would be difficult for the younger children and would make the game less fun, but I'm not sure. 
 
Finding the area can be very simple and other times it can be very difficult and frustrating. Shapes that are easy to find the area of are regular shapes. I classify regular shapes a rectangle, square, triangle, pentagon, etc...
For these shapes, you can easily put them on grid paper and count the boxes that exist within them. To get more technical, for some of these you can use an equation to find the area of these shapes such as:
Rectangle & Square: Base x Height
Triangle: 1/2 x Base x Height


Using a Geoboard I made a couple of regular shapes and found the area of them.

Picture
Finding area of a rectangle: Since I know that to find area I need to do base x height I measured with the Geoboard the side lengths. The height of the rectangle is 1 and the base of the rectangle is 4. So, 4 x 1 = 4, so the area of this rectangle is 4 units squared. 

Picture
Finding area of a triangle: Now that we know the equation to find the area of a triangle is 1/2 x Base x Height I now know to measure the base and height of the triangle I made on the Geoboard. The base of this triangle is 2. The height of this triangle is 3. So now I go back to the formula, 1/2 x 2 x 3 = 3 


If you wanted to count of the squares in the triangle that is possible as well, you just need to mix and match the squares that have been split. I created lines with rubber bands on the Geoboard to represent grid paper so that it would help with adding up the squares. My result of an area was still 3 units squared.

Now, I am going to get into the shapes that are more difficult to find the area of which I refer to as,irregular shapes. With irregular shapes it is more difficult to find the area by counting up the squares inside of them. So, in order to find the area of these shapes I usually split the irregular shape into different sections and work from there. 


Here are some examples of irregular shapes:
Picture
I also decided to make some irregular shapes on a Geoboard and work out what the area was. I started with the shape to the left.


I decided to actually figure out the area of this shape on a piece of paper that had a Geoboard sketch on it to make things easier. I drew grid lines behind the shape to help me:

Picture
For this shape I decided to count the squares within the shape to find the area. I had to do some matching and estimating to come up with my answer. The crazy pink arrows show the pieces of square that I matched together to make 1 square unit. In the end I decided the area was approximately 5 units squared. 

Picture
To the left is the second shape I created to find the area of. Once again I put this shape on Geoboard paper to make finding the area easier. 

Picture
To find the area of this shape, instead of counting the squares inside the shape I decided to count the squares that were outside of the shape. Total, there are 16 squares that make up a Geoboard. When I counted the squares outside of the shape I counted that there were approximately 9 squares outside of the shape. Then I subtracted that number from 16 so, 16-9=7. From this I found that the shape had an area of approximately 7 units squared. To check, I also counted the squares on the inside. When doing this I came up with an area of 6.5 units squared. Either way I believe both methods work, but since I randomly made these shapes I'm not sure what the precise answer is. So using both of the answers I got I would say the shape had an area of around 7 units squared. 

Reflection: Ever since area was introduced to me in elementary school I've always found finding the area of an irregular shape difficult. I always feel like there should be an equation for everything, but that's just how I've learned how math should be. Now doing this as a college student I find that it's okay to make mistakes and get a wrong answer. Doing these area problems it is hard to get an exact answer on your own and I feel that working together on these problems help. I also learned that there are several different ways to look at these problems and different ways to solve for the area. Everyone has different perspectives. 


Feedback: What area did you receive for these shapes? What method did you use to find the area? Is there just one correct way to find area of a shape?